Cloud Vision API を使う Spring Boot Kotlin 編
先日の Cloud Vision API を使う Python3 編 に続いて Spring Boot Kotlin での Cloud Vision API の OCR のコード覚え書きです。
Python で既に書いたコードを Kotlin に移植しました。 Spring Boot は今まで使う機会がなかったのですが、 今回使って良いと思ったのは gradlew bootJar するだけで executable な単一の jar ファイルを生成してくれることです。
ただ Python のようにスクリプトファイルひとつで処理できるような小さな処理に Spring Boot を使うのは気が重いですね。
まず https://start.spring.io/ へアクセスして、 プロジェクトのベースをつくります。 開発環境の制約は Java8 以上が入っていればOK、というのは敷居が低いですね。
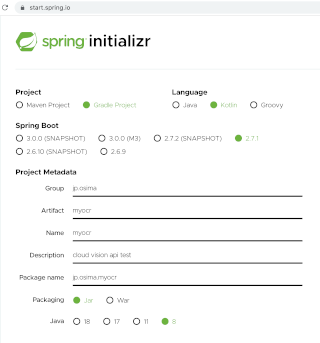
こんな感じに設定しました。
プロジェクトのベースが用意された zip をダウンロードして、ローカル macOS などで適当なディレクトリに展開します。
たくさんファイルやディレクトリがあるのですが、修正するのは以下の2つだけです。
- build.gradle.kts
- src/main/kotlin/jp/osima/myocr/MyocrApplication.kt
build.gradle.kts
dependencies に必要なライブラリを追記します。
implementation("commons-codec:commons-codec:1.7")
implementation("commons-io:commons-io:2.0")
implementation("org.json:json:20210307")
src/main/kotlin/jp/osima/myocr/MyocrApplication.kt
package jp.osima.myocr

import org.springframework.boot.autoconfigure.SpringBootApplication
import org.springframework.boot.runApplication

import java.io.File
import java.io.DataOutputStream
import java.io.BufferedReader
import java.io.InputStreamReader
import java.net.URI
import java.net.HttpURLConnection

import org.apache.commons.io.FileUtils
import org.apache.commons.codec.binary.Base64
import org.json.*

@SpringBootApplication
class MyocrApplication


fun toBase64(imageFile: File): String {
    return Base64.encodeBase64String(FileUtils.readFileToByteArray(imageFile))
}

fun toRequestJson(imageFile: File): String {
    val ocrRequestObject = JSONObject()
    ocrRequestObject.put("image",        JSONObject().put("content", toBase64(imageFile)))
    ocrRequestObject.put("features",     JSONArray().put(JSONObject().put("type", "TEXT_DETECTION")))
    ocrRequestObject.put("imageContext", JSONObject().put("languageHints", JSONArray().put("ja").put("en")))

    return JSONObject().put("requests", JSONArray().put(ocrRequestObject)).toString()
}

fun doPost(apiKey: String, imageFile: File): String {
    val bytes = toRequestJson(imageFile).toByteArray(Charsets.UTF_8)

    val url = "https://vision.googleapis.com/v1/images:annotate?key=${apiKey}"
    val connection = URI(url).toURL().openConnection()
    if( connection is HttpURLConnection ){
        connection.setRequestMethod("POST")
        connection.setDoOutput(true)
        connection.setFixedLengthStreamingMode(bytes.size)
        connection.addRequestProperty("Content-Type", "application/json; charset=UTF-8")

        // 送信
        DataOutputStream(connection.getOutputStream()).use { outputStream->
            outputStream.write(bytes)
        }

        // 受信
        val resultJson = BufferedReader(InputStreamReader(connection.getInputStream(), Charsets.UTF_8)).use { reader->
            reader.readText()
        }

        connection.disconnect()

        return resultJson
    }
    else {
        return "{}"
    }
}

fun saveAs(text: String, file: File): Unit {
    val pw = file.printWriter()
    pw.print(text)
    pw.close()
}

fun main(args: Array<String>) {
    runApplication<MyocrApplication>(*args){
        System.setProperty("java.net.preferIPv4Stack", "true")

        if( args.size>2 ){
            val apiKey = args[0]
            val imageFilePath = args[1]
            val resultJsonFilePath = args[2]
            val imageFile = File(imageFilePath)
            val result = doPost(apiKey, imageFile)
            saveAs(result, File(resultJsonFilePath))
        }
    }
}
処理内容は 前回のエントリーの Python 3 と同じです。
- 画像をbase64文字列にする
- Cloud Vision API に POST するための所定の形式の JSON 文字列を生成
- POST して結果の JSON 文字列を受け取る
- 結果を保存
Kotlin なので 関数定義を中心にコードを記述できるのはうれしいですね。
使い方
まず実行可能(executable)な jar を生成します。
$ ./gradlew bootJar
すると以下に jar が生成されます。
- build/libs/myocr-0.0.1-SNAPSHOT.jar
あとは、実行するだけです。
$ java -jar build/libs/myocr-0.0.1-SNAPSHOT.jar APIKey 画像ファイルパス 結果のJSON保存ファイルパス
以上です。
Liked some of this entry? Buy me a coffee, please.