DeepLab v3 Semantic Segmentation を TensorFlow.js で試す(その2)TensorFlow Lite モデル編
前回は TensorFlow.js 用にコードが用意されていたので、そこそこ簡単に扱うことができた。 今度は TensorFlow Hub にある この TensorFlow Lite モデル版の DeepLab V3 を TensorFlow.js から使ってみる。
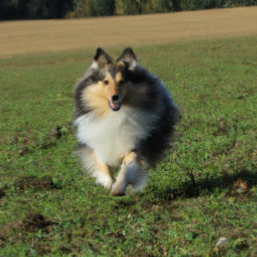
題材とするのは前回と同じこちらの犬の画像です。 ただし、257 x 257 にリサイズしています。
環境の確認
$ node --version
v18.17.0
$ npm --version
9.6.7
Node.js のプロジェクトディレクトリを作成して準備
$ mkdir my-deeplab-v3-tflite
$ cd my-deeplab-v3-tflite
$ npm init -y
必要なモジュールを入れる
$ npm install @tensorflow/tfjs-node
$ npm install tfjs-tflite-node
Webブラウザから TFLite モデルを使う場合は @tensorflow/tfjs-tflite で Node.js の場合は tfjs-tflite-node モジュールを使うようですが、 詳しくは検証していません。
ここでは、Node.js 上で使うので、tfjs-tflite-node モジュールを使います。
対象画像をロード
このモデルの説明(メタデータのタブ)をみると 以下のような記述がある。
Input image to be segmented. The expected image is 257 x 257, with three channels (red, blue, and green) per pixel. Each element in the tensor is a value between -1 and 1.
したがって、以下のように読み込んだ画像の tensor を期待されている入力形式に変換する。
- 値は -1 .. 1 の範囲にする
- 元は 0 .. 255 の範囲になっているはずなので、 (value/127.5) -1 することで -1 .. 1 の範囲に直す
- tf.node.decodeImage で読み込んだ tensor は shape が [257, 257, 3] になる
- インプットする tensor として期待されている shape は [1, 257, 257, 3] なので、 reshape してその形に直す
const fs = require('fs')
const tf = require('@tensorflow/tfjs-node')

const dogImagePath = 'dog_257x257.jpg'
const dogImage = fs.readFileSync(dogImagePath)
const dogImageTensor = tf.node.decodeImage(dogImage)
console.log(dogImageTensor.shape) // [ 257, 257, 3 ]

//const inputTensor = dogImageTensor.reshape( [ 1, 257, 257, 3 ] )
const inputTensor = dogImageTensor.div(255.0/2.0).sub(1).reshape( [ 1, 257, 257, 3 ] )
console.log(inputTensor.shape) // [1, 257, 257, 3 ]
補足 tf.expandDims
reshape を使うのでなく tf.expandDims(aTensor, 0) を使って、先頭に次元をひとつ増やす方が一般的なお作法のようです。//const inputTensor = dogImageTensor.div(255.0/2.0).sub(1).reshape( [ 1, 257, 257, 3 ] ) const inputTensor = tf.expandDims(dogImageTensor.div(127.5).sub(1), 0)
deeplab v3 の モデルをロードして推測
次のモデルを 該当URLからロードして、推測を実行します。
const fs = require('fs')
const tf = require('@tensorflow/tfjs-node')
const tflite = require('tfjs-tflite-node')

const loadModel = async () => {
    const modelURL = 'https://tfhub.dev/tensorflow/lite-model/deeplabv3/1/default/1'
    return await tflite.loadTFLiteModel(modelURL)
}

loadModel().then((model)=>{
    // 画像をロードする.
    const dogImagePath = 'dog_257x257.jpg'
    const dogImage = fs.readFileSync(dogImagePath)
    const dogImageTensor = tf.node.decodeImage(dogImage)
    console.log(dogImageTensor.shape) // [ 257, 257, 3 ]

    //const inputTensor = dogImageTensor.div(255.0/2.0).sub(1).reshape( [ 1, 257, 257, 3 ] )
    const inputTensor = tf.expandDims(dogImageTensor.div(255.0/2.0).sub(1), 0)
    console.log(inputTensor.shape) // [1, 257, 257, 3 ]

    // 推測する.
    const outputTensor = model.predict(inputTensor)
    console.log(outputTensor.shape) // [ 1, 257, 257, 21 ]

    // 後始末する.
    dogImageTensor.dispose()
    inputTensor.dispose()
    outputTensor.dispose()
})
推測の結果得られた tensor の shape は [ 1, 257, 257, 21 ] です。 どういうこと? 最後の dimension が 21 になっているのは、 20の物体および背景の 21種類を識別できるから 21 (classes) なのだろうか? そして、この outputTensor をどう解釈すればいいのか?
回答がここにあった.
どうやら、 最後の dimension の 21 クラスのうち 最大値をとるものが、そのクラスに該当すると推定された という意味らしい。
厳密には、そのピクセルが 21クラスのどこに分類されるのがより確からしいかを表す値(確率値)が入っている、ということだと思う。 もし、猫っぽい犬であれば、猫(8) と犬(12) の確率の値は接近するのであろう。
なるほど、結果の tensor には各21クラスの確率値が入っているわけだ。
ということは、今、犬の写真を対象に処理しているので、話を簡単にするには、 最後の dimension 値が最も大きくなるのが 12番目(犬= 12 のはず)のピクセルがどこにあるかを 把握すればよい。
犬として推測されたピクセルをカウントする
まず、小手試しに犬と推測されたピクセル数をカウントしてみる。
let dogPixelCount = 0
range(257).forEach((y)=>{
    range(257).forEach((x)=>{
        const predictValues = range(21).map(classIndex=> jsArray[0][y][x][classIndex])
        const maxPredictValue = predictValues.reduce( (acc,value) => (acc<value) ? value : acc )
        const classIndexThatHasMaxValue = range(21).map((classIndex)=> {
            return {
                ok: (jsArray[0][y][x][classIndex] == maxPredictValue),
                index: classIndex}
        }).filter( item=> item.ok )[0].index

        if( classIndexThatHasMaxValue==12 ){
            dogPixelCount += 1
        }
    })
})
console.log(dogPixelCount)
実行してみると、 10677 のピクセルが犬として推測されたピクセルとしてカウントされました。
リファクタリング
たいした処理ではないが、ちょっと難解なコードになってしまった。 内容を確認して、最後に関数として書き直します。
まず、そのピクセル(x,y)における 21個の推測値(確率値)を全部取得して配列にする。
const predictValues = range(21).map(classIndex=> jsArray[0][y][x][classIndex])
次に、その中で最大値を得る。(kotlin だったら predictValues.max() のようにしたいだけの話)
const maxPredictValue = predictValues.reduce( (acc,value) => (acc<value) ? value : acc )
次に、その最大値を持つ クラスのインデックス値を探し出す。
const classIndexThatHasMaxValue = range(21).map((classIndex)=> {
    return {
        ok: (jsArray[0][y][x][classIndex] == maxPredictValue),
        index: classIndex}
}).filter( item=> item.ok )[0].index
この部分の計算を toPredictedClassIndex という関数にします。
//
// そのピクセル(x,y)において推測されたクラス番号(クラスのインデックス値)を返す.
//
const toPredictedClassIndex = (jsArray, x,y)=>{
    const predictValues = range(21).map(classIndex=> jsArray[0][y][x][classIndex])
    const maxPredictValue = predictValues.reduce( (acc,value) => (acc<value) ? value : acc )
    return range(21).map((classIndex)=> {
        return {
            ok: (jsArray[0][y][x][classIndex] == maxPredictValue),
            index: classIndex}
    }).filter( item=> item.ok )[0].index
}
推測結果を画像として出力
最後に、この関数を使って、画像として書き出します。 Jimp を使うのでインストールしておきます。
$ npm install jimp
画像として書き出すコードは以下の通り。
const image = new Jimp(257, 257, 'black', (err, image) => {})
const imageW = image.bitmap.width
const imageH = image.bitmap.height
image.scan(0, 0, imageW, imageH, (x, y, idx)=> {
    const predictedClassIndex = toPredictedClassIndex(jsArray, x,y)

    if( predictedClassIndex==12 ){
        image.bitmap.data[idx + 0] = 255 // red
        image.bitmap.data[idx + 1] = 255 // green
        image.bitmap.data[idx + 2] = 255 // blue
        image.bitmap.data[idx + 3] = 255 // alpha
    }
})

image.write('masked-dog_257x257.jpg')
前回の画像書き出しコード とほぼ同じです。
書き出された画像:
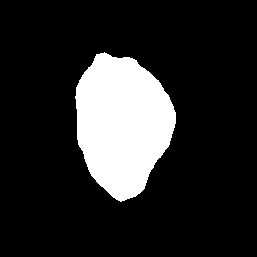
できました!元画像が以下なので、意図通り作動しているようです。
まとめ
完成したコードを掲載します。
const fs = require('fs')
const tf = require('@tensorflow/tfjs-node')
const tflite = require('tfjs-tflite-node')
const Jimp = require('jimp')

const range = (v)=>{ return [...Array(v).keys()] }

const loadModel = async () => {
    const modelURL = 'https://tfhub.dev/tensorflow/lite-model/deeplabv3/1/default/1'
    return await tflite.loadTFLiteModel(modelURL)
}

//
// そのピクセル(x,y)において推測されたクラス番号を返す.
//
const toPredictedClassIndex = (jsArray, x,y)=>{
    const predictValues = range(21).map(classIndex=> jsArray[0][y][x][classIndex])
    const maxPredictValue = predictValues.reduce( (acc,value) => (acc<value) ? value : acc )
    return range(21).map((classIndex)=> {
        return {
            ok: (jsArray[0][y][x][classIndex] == maxPredictValue),
            index: classIndex}
    }).filter( item=> item.ok )[0].index
}

loadModel().then((model)=>{
    // 画像をロードする.
    const dogImagePath = 'dog_257x257.jpg'
    const dogImage = fs.readFileSync(dogImagePath)
    const dogImageTensor = tf.node.decodeImage(dogImage)
    console.log(dogImageTensor.shape) // [ 257, 257, 3 ]

    //const inputTensor = dogImageTensor.div(127.5).sub(1).reshape( [ 1, 257, 257, 3 ] )
    const inputTensor = tf.expandDims(dogImageTensor.div(255.0/2.0).sub(1), 0)
    console.log(inputTensor.shape) // [1, 257, 257, 3 ]

    // 推測する.
    const outputTensor = model.predict(inputTensor)

    // jsArrayにする.
    const jsArray = outputTensor.arraySync()

    /*
    // 犬のピクセルを数える.
    let dogPixelCount = 0
    range(257).forEach((y)=>{
        range(257).forEach((x)=>{
            const predictedClassIndex = toPredictedClassIndex(jsArray, x,y)
            if( predictedClassIndex==12 ){
                dogPixelCount += 1
            }
        })
    })
    console.log(dogPixelCount)
    */

    // 結果を視覚化する.
    const image = new Jimp(257, 257, 'black', (err, image) => {})
    const imageW = image.bitmap.width
    const imageH = image.bitmap.height
    image.scan(0, 0, imageW, imageH, (x, y, idx)=> {
        const predictedClassIndex = toPredictedClassIndex(jsArray, x,y)

        if( predictedClassIndex==12 ){
            image.bitmap.data[idx + 0] = 255 // red
            image.bitmap.data[idx + 1] = 255 // green
            image.bitmap.data[idx + 2] = 255 // blue
            image.bitmap.data[idx + 3] = 255 // alpha
        }
    })

    image.write('masked-dog_257x257.jpg')

    // 後始末する.
    dogImageTensor.dispose()
    inputTensor.dispose()
    outputTensor.dispose()
})
推測結果の tensor の解釈方法がわからず苦労しました。
これで、 TensorFlow Hub にある TFLite モデルを TensorFlow.js で扱える方法を把握できました。 なお、モデルごとに入力や出力の形式が違うので、そこはそれぞれ対応する必要はある。
Liked some of this entry? Buy me a coffee, please.