グラフカットを使った画像の切り抜き(パート2)
パート1 ではグラフカットの基本を確認しました。 パート2では実際にこの理論を使って、パンの写真からパンと背景を分離してみます。
なお、このエントリーはオライリー本の「実践コンピュータビジョン」を参考にしているので詳細はそちらをご覧ください。
パンの写真から切り抜きする
では、この理論を使って、実際にパンの画像を切り抜いてみます。
STEP1 画像をグラフに変換
グラフになっていないとグラフ理論が使えないので、なんとかして画像情報をグラフに変える必要がある。 そのためのやり方のひとつが、 画像のすべてのピクセル(点)と仮想上のソースピクセル(点)とシンクピクセル(点)を追加した上で、 以下のエッジを考えます。
- ソースピクセルとすべての画像ピクセルへのエッジ
- すべての画像ピクセルからシンクピクセルへのエッジ
- すべての画像ピクセルについては隣接する上下左右のピクセルへのエッジ
これで画像情報をグラフに変換できたことになります。
STEP2 最小カットを計算
graph-cut.py
import math
import sys

from PIL import Image

from pygraph.classes.digraph import digraph
from pygraph.algorithms.minmax import maximum_flow

import numpy as np
from matplotlib import pylab as plt


def pixel_rgb(image_array, x, y):
    return image_array[y][x]


MAX_VALUE = math.sqrt( math.pow( 255, 2) + math.pow( 255, 2) + math.pow( 255, 2) )

def create_weight( px_rgb_0, px_rgb_1 ):
	value = math.sqrt(
        math.pow( px_rgb_0[0] - px_rgb_1[0], 2) +
        math.pow( px_rgb_0[1] - px_rgb_1[1], 2) +
        math.pow( px_rgb_0[2] - px_rgb_1[2], 2) )
	return MAX_VALUE - value

def resize_image( image, width ):
    image_array = np.array(image)
    h,w = image_array.shape[:2]
    height = int( float(h) * width/float(w) )
    return image.resize( (width, height), Image.ANTIALIAS )


image_file = sys.argv[1]
original_image = Image.open(image_file).convert('RGB')

# resize
image = resize_image( original_image, 48 )
image_array = np.array(image)
h,w = image_array.shape[:2]

gr = digraph()
gr.add_nodes( range(w*h+2) )

src_index = w*h
sink_index = w*h+1

src_px_rgb     = np.array([0,0,0])
sink_pixel_rgb = np.array([255,255,255])

for x in range(w) :
    for y in range(h):
       index = y + x*h

       # 0)
       current_px_rgb = pixel_rgb(image_array, x,y)

       # 1) add a edge from src to pixel
       weight = create_weight( src_px_rgb, current_px_rgb )
       gr.add_edge( (src_index, index), wt=weight )

       # 2) add a edge from pxiel to sink
       weight = create_weight( current_px_rgb, sink_pixel_rgb )
       gr.add_edge( (index, sink_index), wt=weight )

       # 3)
       # 3-1) if left pixel exists
       if x>0 :
         index_left_px = y + (x-1)*h
         left_px_rgb = pixel_rgb(image_array, x-1,y)
         weight = create_weight( current_px_rgb, left_px_rgb )
         gr.add_edge( (index, index_left_px), wt=weight )

       # 3-2) if top pixel exists
       if y>0 :
         index_top_px = (y-1) + x*h
         top_px_rgb = pixel_rgb(image_array, x,y-1)
         weight = create_weight( current_px_rgb, top_px_rgb )
         gr.add_edge( (index, index_top_px), wt=weight )

       # 3-3) if right pixel exists
       if x<(w-1) :
         index_right_px = y + (x+1)*h
         right_px_rgb = pixel_rgb(image_array, x+1,y)
         weight = create_weight( current_px_rgb, right_px_rgb )
         gr.add_edge( (index, index_right_px), wt=weight )

       # 3-4) if bottom pixel exists
       if y<(h-1) :
         index_bottom_px = (y+1) + x*h
         bottom_px_rgb = pixel_rgb(image_array, x,y+1)
         weight = create_weight( current_px_rgb, bottom_px_rgb )
         gr.add_edge( (index, index_bottom_px), wt=weight )


flows,cuts = maximum_flow(gr, src_index, sink_index)

# save result
result_image = Image.new('RGB', image.size)

for x in range(w):
    for y in range(h):
       index = y + x*h
       if cuts[index]==1:
         result_image.putpixel((x,y),(255,255,255))
       else :
         result_image.putpixel((x,y),(0,0,0))

original_h, original_w = np.array(original_image).shape[:2]
resize_image( result_image, original_w ).save( "result.png" )
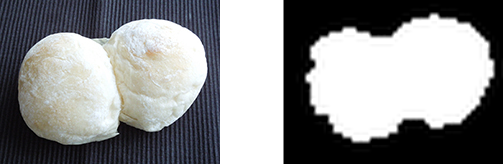
※ 画像サイズが大きいと処理に時間がかかるため、横48px にリサイズした上で計算しています。
※ ピクセルをパンと背景の2つに分離して、パンの方を白色、背景を黒に塗っています。

うまく領域分割できたようです。 パート3 では、このコードを使って様々なパンの画像の切り抜きをやってみます。
Liked some of this entry? Buy me a coffee, please.