TensorFlow で MNIST その3【TensorFlow.js で推測する ブラウザ編】
前回のエントリーでは Node.js 上で推測を実行しましたが、 今回はこれをブラウザ上でやってみます。
前準備
ブラウザで推測を実行するには TensorFlow Lite モデルを使います。 したがって、前々回で作成した model.keras を TensorFlow Lite モデルに変換する必要があります。
TensorFlow Lite は「モバイル端末上でより軽量でより高速に推論できるように最適化された・・・」とかなんとか。
TensorFlow や Keras には .h5 とか .keras とか複数の形式があります。 とにかく .keras の拡張子で保存したモデルは以下の 手順で TensorFlow Lite モデルに変換できます。
load_and_save_as_h5.py
from tensorflow import keras

model = keras.models.load_model("model.keras")
print(model)
model.save("model.h5")
pip で入れておくべきモジュールなどの環境については 前々回のエントリーを参照。
変換。
$ python load_and_save_as_h5.py
これで一旦 h5 形式 のモデル model.h5 を生成しておいてから、コマンドラインツールの tflite_convert で TensorFlow Lite モデルを生成します。
$ tflite_convert \
  --keras_model_file=./model.h5 \
  --output_file=./model.tflite
これで TensorFlow Lite モデル用意できたので、まずは Node.js 上で使います。
Node.js で TensorFlow Lite を使って推論する
環境確認:
$ node -v
v18.12.1
$ npm -v
8.19.2
プロジェクトディレクトリを作成して、必要なモジュールを入れます。
$ mkdir mytflite
$ cd mytflite
$ npm init -y
$ npm install @tensorflow/tfjs-node@4.10.0
$ npm install tfjs-tflite-node@0.0.2
$ touch index.js
先に用意した model.tflite が読み込めるか確認します。
index.js
const tflite = require('tfjs-tflite-node')

tflite.loadTFLiteModel('./model.tflite').then((model)=>{
    console.log(model)
})
実行。
$ node index
TFLiteModel { modelRunner: Interpreter {} }
うまくいっているようです。
では、gray_0.jpg をこのモデルで推測してみます。
index.js
const fs = require('fs')
const tf = require('@tensorflow/tfjs-node')
const tflite = require('tfjs-tflite-node')

tflite.loadTFLiteModel('./model.tflite').then((model)=>{
    const image = fs.readFileSync('gray_0.jpg')
    const tensor0 = tf.node.decodeImage(image)
    console.log( tensor0.shape ) // [ 28, 28, 1 ]

    const tensor1 = tensor0.div(255)
    const inputTensor = tf.expandDims( tensor1 )
    console.log( inputTensor.shape ) // [ 1, 28, 28, 1 ]

    const outputTensors = model.predict( inputTensor )
    console.log( outputTensors.shape ) // [ 1, 10 ]
    const jsArray = outputTensors.arraySync()
    jsArray[0].forEach((value, index)=>{
        const v = Number.parseFloat(value).toFixed(10)
        console.log( `- ${index} => ${v}` )
    })
})
コードの内容は前回と同じです。 詳細はそちらを参照。
実行します。
$ node index.js
[ 28, 28, 1 ]
[ 1, 28, 28, 1 ]
[ 1, 10 ]
- 0 => 0.9993641973
- 1 => 0.0000000001
- 2 => 0.0000067655
- 3 => 0.0000022582
- 4 => 0.0000016466
- 5 => 0.0000000084
- 6 => 0.0004208343
- 7 => 0.0000217544
- 8 => 0.0001810830
- 9 => 0.0000014795
推測できました。
ブラウザ上で推測を実行
いよいよ本題のブラウザ上で推測を行います。
このまま mytflite の Node.js プロジェクトを上で作業を続けるので、今の段階でのファイル構成を確認します。
.
├── gray_0.jpg
├── index.js
├── model.tflite
├── node_modules
│   └── ...
├── package.json
└── package-lock.json
それでは、 ブラウザで作動させるためのコードを index.html に書いていきます。
index.html
<html>
<head>
    <script src="./node_modules/@tensorflow/tfjs/dist/tf.min.js"></script>
    <script src="./node_modules/tfjs-tflite-node/node_modules/@tensorflow/tfjs-tflite/dist/tf-tflite.min.js"></script>
</head>
<body>
    <img src="./gray_0.jpg" id="gray_0" />
    <script>
        const range = (v)=>{ return [...Array(v).keys()] }

        tflite.setWasmPath('./node_modules/tfjs-tflite-node/node_modules/@tensorflow/tfjs-tflite/wasm/')

        tflite.loadTFLiteModel('./model.tflite').then((model)=>{
            tf.tidy(()=>{
                console.log(model)

                const imageSize = 28
                const tensor0 = tf.image.resizeBilinear(
                    tf.browser.fromPixels( document.getElementById('gray_0') ),
                    [imageSize, imageSize])
                console.log( tensor0.shape )
            })
        })
    </script>
</body>
</html>
ローカルでウェブサーバを起動します。
$ python -m http.server 8080
Firefox または Chrome 等で以下のURLにアクセスします。
- http://localhost:8080/
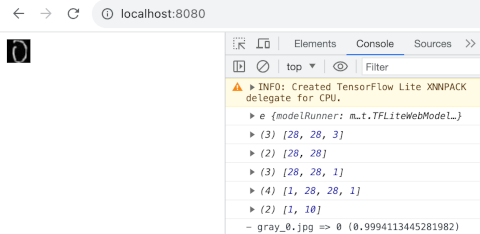
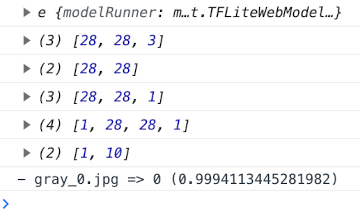
ブラウザの開発者ツールのウェブコンソールから console.log した内容を確認します。

tf.min.js や tf-tflite.min.js は ローカルの代わりに CDN にあるそれを利用することもできます。
<script src="https://cdn.jsdelivr.net/npm/@tensorflow/tfjs@4.10.0/dist/tf.min.js"></script>
<script src="https://cdn.jsdelivr.net/npm/@tensorflow/tfjs-tflite@0.0.1-alpha.10/dist/tf-tflite.min.js"></script>
画像のテンソルの shape を [ 28, 28, 1 ] にする
今 tensor0 の shape は [ 28, 28, 3 ] になっている。 この shape を [ 28, 28, 1 ] にしたい。
以下のコードで中身を調べてみると RGB 値は全部同じ値が入っている。
const jsArray = tensor0.arraySync()

range(28).forEach((y)=> {
    range(28).forEach((x)=>{
        const rgb = jsArray[y][x]
        console.log(rgb)
    })
})
ならば、先頭の R の値だけを使うことにして 形状(shape)が [ 28, 28, 1 ] のテンソルをつくる。
const jsArray = tensor0.arraySync()

// 1)
const buffer = []
range(28).forEach((y)=> {
    range(28).forEach((x)=>{
        const rgb = jsArray[y][x]
        //console.log(rgb)
        const red = rgb[0]
        buffer.push(red)
    })
})

// 2)
const tensor1 = tf.tensor(buffer, [28,28], 'int32')
console.log( tensor1.shape ) // [28, 28]

// 3)
const tensor2 = tf.expandDims(tensor1, -1)
console.log( tensor2.shape ) // [28, 28, 1]
- (1) buffer を用意
- (2) buffer を [28, 28] の shape に reshape する
- (3) tf.expandDims で二番目の引数に -1 (最後を expand するということ)指定して [28, 28, 1] の shape に reshape する
もっと簡単な方法はないのか? とりあえず、目的は果たしたのでこれでよいとする。
値の範囲をスケール
ここから更に 0..255 の値になっているのを 0.0..1.0 の範囲にスケールする。
const tensor3 = tensor2.div(255)
さらに先頭にバッチ用の次元を追加する。
const inputTensor = tf.expandDims( tensor3 )
推測と結果の出力
これでやっと model.predict() するためのテンソルをつくることができた。 あとは推測して結果を見るだけです。
const outputTensors = model.predict( inputTensor )
console.log( outputTensors.shape ) // [ 1, 10 ]

const maxValueIndex = tf.argMax(outputTensors, 1).arraySync()[0]
const maxValue      = tf.max(outputTensors, 1).arraySync()[0]
console.log( `- gray_0.jpg => ${maxValueIndex} (${maxValue})` )
以上で完成です。
ブラウザをリロードしてウェブコンソールを確認すると以下のように出力されます。
まとめ
これで Python の TensorFlow でつくったモデルを変換して ウェブで使う方法が把握できました。
最後に完成した index.html 全体を掲載します。
<html>
<head>
    <script src="./node_modules/@tensorflow/tfjs/dist/tf.min.js"></script>
    <script src="./node_modules/tfjs-tflite-node/node_modules/@tensorflow/tfjs-tflite/dist/tf-tflite.min.js"></script>

    <!--
    <script src="https://cdn.jsdelivr.net/npm/@tensorflow/tfjs@4.10.0/dist/tf.min.js"></script>
    <script src="https://cdn.jsdelivr.net/npm/@tensorflow/tfjs-tflite@0.0.1-alpha.10/dist/tf-tflite.min.js"></script>
    -->
</head>
<body>
    <img src="./gray_0.jpg" id="gray_0" />
    <script>
        const range = (v)=>{ return [...Array(v).keys()] }

        tflite.setWasmPath('./node_modules/tfjs-tflite-node/node_modules/@tensorflow/tfjs-tflite/wasm/')

        tflite.loadTFLiteModel('./model.tflite').then((model)=>{
            tf.tidy(()=>{
                console.log(model)

                const imageSize = 28

                const tensor0 = tf.image.resizeBilinear(
                    tf.browser.fromPixels( document.getElementById('gray_0') ),
                    [imageSize, imageSize])
                console.log( tensor0.shape ) // [28, 28, 3]

                const jsArray = tensor0.arraySync()

                const buffer = []
                range(28).forEach((y)=> {
                    range(28).forEach((x)=>{
                        const rgb = jsArray[y][x]
                        //console.log(rgb)
                        const red = rgb[0]
                        buffer.push(red)
                    })
                })

                const tensor1 = tf.tensor(buffer, [28,28], 'int32')
                console.log( tensor1.shape ) // [28, 28]

                const tensor2 = tf.expandDims(tensor1, -1)
                console.log( tensor2.shape ) // [28, 28, 1]

                const tensor3 = tensor2.div(255)

                const inputTensor = tf.expandDims( tensor3 )
                console.log( inputTensor.shape ) // [1, 28, 28, 1]

                const outputTensors = model.predict( inputTensor )
                console.log( outputTensors.shape ) // [ 1, 10 ]

                const maxValueIndex = tf.argMax(outputTensors, 1).arraySync()[0]
                const maxValue      = tf.max(outputTensors, 1).arraySync()[0]
                console.log( `- gray_0.jpg => ${maxValueIndex} (${maxValue})` )
            })
        })
    </script>
</body>
</html>
Liked some of this entry? Buy me a coffee, please.