TensorFlow で MNIST その5【TensorFlow.js でトレーニングしてブラウザで作動確認】
ブラウザでの作動については その3のエントリーでも試したのですが、 そのときは、TensorFlow Lite モデルを使いました。 このエントリーでは、TensorFlow.js でトレーニングして生成したモデルをそのままブラウザで使用する方法を確認します。
環境
$ node -v
v12.22.9
$ npm -v
8.5.1
プロジェクト作成とモジュールインストール
$ mkdir my-mnist
$ cd my-mnist
$ npm init -y
$ npm install @tensorflow/tfjs-node@4.10.0
MNIST データの用意
KotlinDL経由でダウンロードしたMNISTデータを使います。 ./data ディレクトリをそっくりこのプロジェクトにコピーしておきます。
.
├── data
│   ├── test
│   │   ├── img/
│   │   └── label/
│   └── train
│       ├── img/
│       └── label/
├── node_modules/
├── package.json
└── package-lock.json
train.js
./data/ 以下のデータセットを使ってトレーニングをするコード。
const fs = require('fs')
const path = require('path')
const tf = require('@tensorflow/tfjs-node')

const createModel = (numClasses, inputShape)=> {
    const model = tf.sequential()

    model.add(
        tf.layers.conv2d({
            filters: 32,
            kernelSize: 3,
            strides: 1,
            padding: 'valid',
            activation: 'relu',
            inputShape: inputShape
        })
    )

    model.add(tf.layers.maxPooling2d({ poolSize: [2, 2] }))

    model.add(
        tf.layers.conv2d({
            filters: 64,
            kernelSize: 3,
            strides: 1,
            padding: 'valid',
            activation: 'relu',
        })
    )

    model.add(tf.layers.maxPooling2d({ poolSize: [2, 2], }))
    model.add(tf.layers.flatten())
    model.add(tf.layers.dropout(0.5))
    model.add(
        tf.layers.dense({
            units: numClasses,
            activation: 'softmax'
        })
    )

    return model
}

const loadData = ()=>{
    const toImgTensor = (jpgFile)=> {
        const image = fs.readFileSync(jpgFile)
        const tensor0 = tf.node.decodeImage(image, 1)
        return tensor0.div(255) // 0..1 の範囲に値をスケール.
    }

    const toLabelTensor = (csvFile)=> {
        const text = fs.readFileSync(csvFile, 'utf8')
        const values = text.split(/,/).map( (value)=> parseInt(value) )
        return tf.tensor(values, null, 'float32')
    }

    // 1) train
    const trainImgDir = 'data/train/img'
    const trainImgFilenames = fs.readdirSync(trainImgDir)
    const trainImgFiles = trainImgFilenames.map((filename)=> path.join(trainImgDir, filename))
    const xTrain = tf.stack( trainImgFiles.map( toImgTensor ) )

    const trainLabelDir = 'data/train/label'
    const trainLabelFilenames = fs.readdirSync(trainLabelDir)
    const trainLabelFiles = trainLabelFilenames.map((filename)=> path.join(trainLabelDir, filename))
    const yTrain = tf.stack( trainLabelFiles.map( toLabelTensor ) )

    // 2) test
    const testImgDir = 'data/test/img'
    const testImgFilenames = fs.readdirSync(testImgDir)
    const testImgFiles = testImgFilenames.map((filename)=> path.join(testImgDir, filename))
    const xTest = tf.stack( testImgFiles.map( toImgTensor ) )

    const testLabelDir = 'data/test/label'
    const testLabelFilenames = fs.readdirSync(testLabelDir)
    const testLabelFiles = testLabelFilenames.map((filename)=> path.join(testLabelDir, filename))
    const yTest = tf.stack( testLabelFiles.map( toLabelTensor ) )

    return {
        xTrain: xTrain,
        yTrain: yTrain,
        xTest: xTest,
        yTest: yTest}
}


const train = async (model, dataset, batchSize, epochs, printCallback) => {
    const xTrain = dataset.xTrain
    const yTrain = dataset.yTrain
    const xTest = dataset.xTest
    const yTest = dataset.yTest

    model.compile({
        loss: 'categoricalCrossentropy',
        optimizer: 'adam',
        metrics: ['accuracy']
    })

    await model.fit(xTrain, yTrain, {
        epochs: epochs,
        callbacks: printCallback,
        batchSize: batchSize,
        //validationData: [xTest, yTest]
        validationSplit: 0.2
    })

    const score = await model.evaluate(dataset.xTrain, dataset.yTrain)
    console.log( `Test loss:     ${score[0]}` )
    console.log( `Test accuracy: ${score[1]}` )

    const modelDirPath     = path.join(__dirname, 'mymodel')
    await model.save(`file://${modelDirPath}`)
}

const batchSize = 128
const epochs    = 15

const numClasses = 10
const inputShape = [28, 28, 1]

const model = createModel(numClasses, inputShape)
model.summary()

const dataset = loadData()

train(
    model,
    dataset,
    batchSize,
    epochs,
    { onEpochEnd: (epoch, log)=> { console.log(epoch, log) } }
)
トレーニング実行。
$ node train.js

...

Test loss:     Tensor
    0.01775769703090191
Test accuracy: Tensor
    0.995283305644989
トレーニング結果のモデルは ./mymodel/ 以下に保存されます。
./mymodel/
├── model.json
└── weights.bin
作動確認用の手描き数字画像の用意
モデルをブラウザで使う前に、作動確認のため Node.js で推測を実行します。
./images/ 以下に 0.jpg から 9.jpg まで手描き数字画像を用意しておきます。
 0.jpg
0.jpg 1.jpg
1.jpg 2.jpg
2.jpg 3.jpg
3.jpg 4.jpg
4.jpg 5.jpg
5.jpg 6.jpg
6.jpg 7.jpg
7.jpg 8.jpg
8.jpg 9.jpg
9.jpg
infer.js
const fs = require('fs')
const path = require('path')
const tf = require('@tensorflow/tfjs-node')

const range = (v)=>{ return [...Array(v).keys()] }

const infer = async ()=> {
    const modelDirPath  = path.join(__dirname, 'mymodel')
    const modelFilePath = path.join(modelDirPath, 'model.json')
    const model = await tf.loadLayersModel( `file://${modelFilePath}` )

    const imagesDir = 'images'
    const imageFilenames = fs.readdirSync(imagesDir)

    const inputTensorList = imageFilenames.map((imageFilename)=> {
        const image = fs.readFileSync(path.join(imagesDir, imageFilename))
        const tensor0 = tf.node.decodeImage(image)
        return tensor0.div(255) // 0..1 の範囲に値をスケール.
    })

    const inputTensors = tf.stack(inputTensorList)
    console.log(inputTensors.shape)

    const outputTensors = model.predict( inputTensors )
    console.log( outputTensors.shape ) // [ 10, 10 ]

    const maxValueIndexes = tf.argMax(outputTensors, 1).arraySync()
    const maxValues       = tf.max(outputTensors, 1).arraySync()

    range(10).forEach((i)=> {
        console.log( `- ${imageFilenames[i]} => ${maxValueIndexes[i]} (${maxValues[i]})` )
    })
}

infer()
実行して作動を確かめます。
$ node infer.js
- 0.jpg => 0 (0.9999876618385315)
- 1.jpg => 1 (0.9999874234199524)
- 2.jpg => 2 (0.9999461770057678)
- 3.jpg => 3 (0.9999992251396179)
- 4.jpg => 4 (0.8022770285606384)
- 5.jpg => 5 (0.9999999403953552)
- 6.jpg => 6 (0.9431164860725403)
- 7.jpg => 7 (0.9998982548713684)
- 8.jpg => 8 (0.9999933242797852)
- 9.jpg => 8 (0.7432070374488831)
問題ないようです。( 9.jpg の推測には失敗していますが。)
index.html
いよいよブラウザで推測を行います。
index.html にコードを書きますが、TensorFlow.js のライブラリが必要です。 それは次のように CDN からロードします。
<script src="https://cdn.jsdelivr.net/npm/@tensorflow/tfjs@4.10.0/dist/tf.min.js"></script>
残りの JavaScript 部分は infer.js とほぼ同じです。
<!DOCTYPE html>
<html>
<head>
<script src="https://cdn.jsdelivr.net/npm/@tensorflow/tfjs@4.10.0/dist/tf.min.js"></script>
</head>
<body>
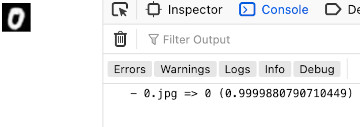
<img src="./images/0.jpg" id="image0" />
<script>
const range = (v)=>{ return [...Array(v).keys()] }
const toInputTensor = (image, imageSize)=>{
const tensor = tf.image.resizeBilinear(tf.browser.fromPixels( image ), [imageSize, imageSize])
const jsArray = tensor.arraySync()
const buffer = []
range(imageSize).forEach((y)=> {
range(imageSize).forEach((x)=>{
const rgb = jsArray[y][x]
const colorValue = (rgb[0] + rgb[1] + rgb[2]) / 3
buffer.push(colorValue)
})
})
const tensor1 = tf.tensor(buffer, [imageSize,imageSize], 'int32')
const tensor2 = tf.expandDims(tensor1, -1) // [28, 28, 1]
const tensor3 = tensor2.div(255)
const inputTensor = tf.expandDims( tensor3 ) // [1, 28, 28, 1]
return inputTensor
}
const hostname = 'localhost'
const port = 8080
tf.ready().then(()=>{
tf.loadLayersModel( `http://${hostname}:${port}/mymodel/model.json` ).then((model)=>{
//console.log('begin', tf.memory().numTensors)
tf.tidy(()=>{
const imageSize = 28
const image = document.getElementById('image0')
const inputTensor = toInputTensor(image , imageSize)
const outputTensor = model.predict( inputTensor )
const maxValueIndex = tf.argMax(outputTensor, 1).arraySync()[0]
const maxValue = tf.max(outputTensor, 1).arraySync()[0]
console.log( `- 0.jpg => ${maxValueIndex} (${maxValue})` )
})
//console.log('end', tf.memory().numTensors)
})
})
</script>
</body>
</html>
補足: tf.browser.fromPixels() を使って画像のテンソルを生成している部分のコードについて
formPixels() のAPI( https://js.tensorflow.org/api/1.0.0/#browser.fromPixels )を見ると、二番目の引数としてオプションで numChannels (色のチャンネル数)が指定できる。 したがって、ここで読み込む画像がグレースケール画像とわかっているのであれば、1 を指定すればよい。
現状のコードでは無指定のため、(たぶんデフォルトとして)3 が指定されたことになり、 上記コードの rgb は R,G,B の3つのチャンネル値が入っている。 これを念の為 R,G,Bのそれぞれの値をとって3で割っているが(平均値を算出)実際のところ、 このケースでは、R,G,B の値は全部同じ値。 だからわざわざ平均の計算をする必要はなく、Rの値だけ使うことにしても問題はない。
ただ、だったら、fromPixels で二番目の引数に 1 を指定して画像のテンソルを取得した方がいい。 結局、この部分は以下のコードの方がよいことになる。
const tensor = tf.image.resizeBilinear(tf.browser.fromPixels(image, 1), [imageSize, imageSize]) const jsArray = tensor.arraySync() const buffer = [] range(imageSize).forEach((y)=> { range(imageSize).forEach((x)=>{ const colorValues = jsArray[y][x] buffer.push(colorValues[0]) }) })ちなみに、fromPixels(image, 1) として画像のテンソルを取得しているので、colorValues の配列の長さも 1 になっている。
あとは、ローカルでウェブサーバを実行します。
$ python3 -m http.server 8080
起動したら http://localhost:8080/ にアクセスして作動を確かめます。 推測結果は console.log() されるだけなので、ディベロッパーツールを開いてウェブコンソールを確認します。
以上です。
Liked some of this entry? Buy me a coffee, please.